
The Rule of Thirds 📸
Ecclesiastes 3:1
“There is an occasion for everything, and a time for every activity under heaven.”
Everything has its proper time and place. In photography, where you place your subject can completely change how a photograph looks and feels.
Today, we are learning one of the easiest ways to make your photographs more interesting:
The Rule of Thirds

What Is Composition?
Before we learn the Rule of Thirds, we need to understand an important photography word:
Composition
Composition means how everything is arranged inside your photograph.
Imagine your photograph is a picture frame.
You get to decide:
- What goes inside the frame
- What stays outside the frame
- Where your subject is placed
- How much empty space you leave
- What you want people to notice first
You are not just taking a picture.
You are deciding how someone will see the scene.
Discuss
Meet the Rule of Thirds
Imagine drawing a giant tic-tac-toe grid over your camera screen.
It would look something like this:
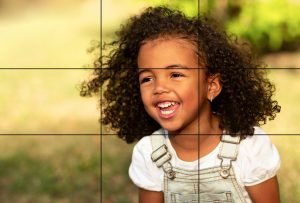
The grid divides your photograph into 9 sections.
It also creates 4 important intersection points, where the lines cross.
These areas can help you decide where to place the most important part of your photograph.
Wait... Doesn't the Subject Go in the Middle?
Sometimes!
Putting your subject directly in the center can create a great photograph.
But photographers don't always want their subject in the middle.
The Rule of Thirds suggests placing your subject along one of the grid lines or near one of the four places where the lines cross.
Instead of this:
EMPTY | SUBJECT | EMPTY
Try this:
SUBJECT | EMPTY | EMPTY
This can make your photograph feel more interesting and give the viewer's eyes somewhere to travel.
Example: Photographing a Person
Imagine you are taking a picture of your friend standing outside.
You could place your friend directly in the center.
But let's try the Rule of Thirds.
Imagine your tic-tac-toe grid.
Position your friend near the left or right vertical line.
Now the photograph has your friend on one side and the environment on the other.
The background becomes part of the story!
Example: Photographing a Sunset
You are standing outside looking at an amazing sunset.
Where should you place the horizon?
You could put it directly through the middle.
But the Rule of Thirds gives you another option.
If the sky is the most interesting part, place the horizon near the bottom horizontal line.
That gives more space to the sky.
If the ground is the most interesting part, place the horizon near the top horizontal line.
That gives more space to the landscape.
The photographer decides what deserves the most attention.
Example: Photographing an Animal
Imagine you are photographing a dog looking toward the right side of your picture.
Instead of putting the dog directly in the center, place the dog closer to the left third.
Why?
Now there is space in front of the dog.
The viewer can see the direction the dog is looking.
This is sometimes called looking room or lead room.
Your photograph begins to tell a story.
What is the dog looking at?
What About Faces?
When photographing a person, try placing their eyes near the upper horizontal grid line.
Our eyes naturally look for another person's eyes in a photograph.
This small change can make portraits feel more balanced and interesting.
Try it the next time you photograph someone!
Can I Turn On the Grid on My Camera?
Yes!
Many phones and cameras have an option that displays grid lines on the screen.
The grid does not appear in your final photograph.
It is simply a tool to help you compose your picture.
If your device has a grid option, try turning it on.
Now you have a Rule of Thirds guide everywhere you go!
Activity
GAME: Grid Challenge
It’s Time to Practice!
Imagine a tic-tac-toe grid over everything you see in the classroom.
Your teacher will call out a photography challenge. Decide where you would place the subject on the grid to use the Rule of Thirds.
Challenge 1: The Backpack 🎒
Choose a backpack in the classroom.
Where would you place it?
Left third?
Center?
Right third?
Why does your choice make the photo more interesting?
Challenge 2: The Classroom
Pretend you want to take a photo that shows the classroom.
What is the most interesting part of the room?
Would you place it near the:
Top third?
Middle?
Bottom third?
Remember, the most important part of your picture should get your attention.
Challenge 3: Your Classmate
Your classmate is standing on the right side of your picture and looking toward the left.
Where should you leave open space?
Answer: Leave space on the left, in the direction they are looking.
Now try it with your camera!
Challenge 4: Something Small
Find something small nearby, such as a pencil, eraser, water bottle, book, or classroom decoration.
Instead of putting it directly in the center, try placing it near one of the four Rule of Thirds intersection points.
Take the picture and see how it looks!
Bonus Challenge: 📸 Take the Shot!
Now take 3 classroom photos:
- One subject on the left third
- One subject on the right third
- One subject near an intersection point
Then compare your pictures with a classmate. Which photo has the strongest composition?
Challenge 5: Your Choice!
Look around the room.
Choose one object that could make an interesting photograph.
Without taking the picture yet, imagine the tic-tac-toe grid.
Decide where you would place your subject.
Now take the photograph!
Rule of Thirds Photo Challenge
Let's practice with your camera.
Take three practice photographs.
Photo 1: LEFT
Place your subject near the left third of your photograph.
Photo 2: RIGHT
Place your subject near the right third of your photograph.
Photo 3: YOUR CHOICE
Use any Rule of Thirds line or intersection.
Compare your photographs.
Which composition do you like best?
Why?
Homework
Rule of Thirds Challenge 📸
Take 3 photographs using the Rule of Thirds.
-
Photo #1: Place your subject on the left or right third.
-
Photo #2: Place an important part of your subject near one of the four intersection points.
-
Photo #3: Your choice! Create a photograph that clearly demonstrates the Rule of Thirds.
Be prepared to show your photographs in class and explain:
Where did you place your subject, and why?
Remember
Don't just...
POINT → CLICK
Start thinking like a photographer:
LOOK → COMPOSE → CLICK
The next time you raise your camera, imagine that tic-tac-toe grid and ask:
Where should my subject go?